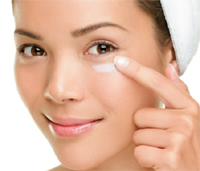
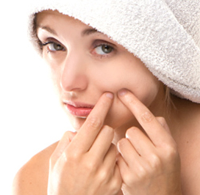
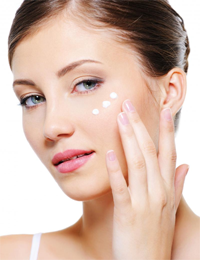
Home remedies to cure dark circles The skin region close to your eyes is very delicate than most other areas as it no oil glands and displays a fine texture. There is a need for special care and any dark circles here due to hereditary factors, illness, stress, lack of sleep, and nutritional deficiencies reflects your health very much. There are some homemade remedies to address the problem of dark circles! -Cucumber juice is a common remedy which has to be applied daily around eyes and you can wash it off with plain water after 15 minutes. Mix potato juice and cucumber juice in equal proportion and follow the same procedure. - Dark circles is also treated by mixing cucumber juice with lemon juice followed by rinsing after 15 minutes. - Tomato juice will enhance skin colour. - Start practicing deep breathing exercises which helps in dealing with stress and also oxygenates the body. - Use iced water or cold milk for closed lids and allow it to remain for 15-20 minutes which helps greatly! - Kalam Dhari

టమాటాతో అందం,ఆకర్షణ.. ఫ్రీ చర్మ సమస్యలను చాలా సులువుగా టమాటాలతో నివారించవచ్చు. సహజ సన్ స్క్రీన్ లా పనిచేసే టమాటాతో మొటిమలువంటివి పోయి, మంచి నిగారింపు కూడా వస్తుంది. అసలు ఈ టమాటలను ఏ విధంగా వాడలో చూద్దామా...! 1. జిడ్డు చర్మం వారు... ఒక టమాటాను గుజ్జులా చేసి వడకట్టి, దీనికి కొద్దిగా కీరదోస రసం కలిపి దూదితో ముఖమంతా రాసుకోవాలి. కాసేపయ్యాక కడిగేసుకోవాలి. ఇలా చేస్తే జిడ్డు చర్మం పోయి, చర్మం కాంతివంతంగా తయారవుతుంది. 2. తాజా టమాటా రసం ఓ టేబుల్ స్పూను తీసుకుని నాలుగు చుక్కల నిమ్మరసం కలపాలి. ఇందులో దూదిని ముంచి ముఖమంతా రాసుకుంటూ, మర్దన చేయాలి. పదిహేను నిమిషాల తరవాత చల్లనినీటితో కడిగేసుకోవాలి. దీనివల్ల చర్మంపై పేరుకున్న అధికజిడ్డు, మురికి వదులుతుంది. 3. టమాటారసం చిక్కని మిశ్రమం అయ్యేదాకా తేనె కలపాలి. దీన్ని ముఖానికి రాసుకుని పదిహేను నిమిషాల తరవాత కడిగేయాలి. ఎండ కారణంగా నల్లగా మారి జీవం కోల్పోయిన చర్మానికి మెరుపునందిస్తుంది. 4. టమాటాతో ఇంట్లోనే క్లెన్సర్ ను తయారు చేసుకోవచ్చు. టమాటాగుజ్జుకు సమపాళ్లలో పాలు కలపాలి. దీన్ని సీసాలోకి తీసుకుని ఫ్రిజ్ లో ఉంచుకోవాలి. ప్రతిరోజు ముఖం, మెడకు రాసుకుని మునివేళ్లతో మర్దన చేయాలి. పదినిమిషాలయ్యాక చల్లనినీటితో కడిగేసుకుంటే.. చర్మం తాజాదనంతో మెరిసిపోతుంది. 5. ఎండ కారణంగా కమిలి ఎర్రగా మారిన చర్మానికి రెండు చెంచాల టమాటాగుజ్జులో నాలుగు టేబుల్స్పూన్ల మజ్జిగ కలిపి చర్మమంతా రాసుకోవాలి. అరగంటాగి కడిగేసుకుంటే తేడా ఉంటుంది. 6. అదే విధంగా టమాటా గుజ్జుకు కొద్దిగా పెరుగు కలిపి ముఖం, మెడ, చేతులు, పాదాలకు పూతలా వేయాలి. ఇరవై నిమిషాల తరవాత కడిగేయాలి. టమాటా చర్మాన్ని చల్లబరుస్తుంది. ఇక పెరుగు శరీరానికి అవసరమైన ప్రొటీన్ను అందించి మృదువుగా మారుస్తుంది.
5 beauty treatments to avoid just before your wedding Here’s a list of beauty treatments that you should avoid just before your wedding. Botox While there are many who swear by it (read many Bollywood celebrities), Botox injections may have an adverse effect. Instead of injecting a new lease of life, you might end up with a crooked eyebrow or a twisted jaw line. The level of danger increases if you are a first-timer. The closer you are to the wedding, the better it is to stay away from this beauty treatment. Lip plumping Everyone is doing the pouts these days. While some are naturally endowed, others are taking help of artificial plumping devices. Brides, take note that fillers usually take 2-4 weeks to heal completely. The initial effect of fillers make the lips look swollen. Not too photogenic, may we state! If at all you wish to plump it up, do it at least 6-7 weeks ahead of the wedding. Chemical peeling Chemical peels are known to remove dead cells, erase fine lines and lighten uneven dark blotches. But the intensity of the beauty treatment causes severe dryness, leading to flaky skin and itchiness. Even a gentle chemical peel may cause irritation and affect the bridal makeup session. Chemical peeling should be done at least 2 weeks before the wedding. Microdermabrasion A very popular pre-wedding beauty treatment, microdermabrasion is known for its many benefits. But if not done by an experienced person and not in a stipulated period of time, it can do uncontrolled damage. Make sure that you get the beauty treatment done from a reputed salon at least 6 months ahead of the wedding to prevent any kind of breakouts. Cosmetic surgeries With reduced costs and numerous beauty clinics providing these services, brides do not shy away from going under the knife. Liposuction, rhinoplasty, body sculpting, dimple creation, breast augmentation are some of the most popular pre-wedding beauty treatment surgeries. Not only is the risk of some of the cosmetic surgeries high, getting them done just before the wedding is not advisable at all.


మీ అందాన్ని పెంచే టోనింగ్ సీక్రెట్స్...! చర్మానికి అందాన్ని తెచ్చి, కాంతివంతంగా మార్చే టోనింగ్ గురించి మీకు ఏమైనా తెలుసా..? అసలు ఈ టోనింగ్ ను ఎలా వాడాలి? ఎలా తయారు చేసుకోవాలి? అనే విషయాలు తెలుసుకొని, టోనింగ్ ద్వారా మన అందాన్ని మరింత కాంతివంతంగా తయారు చేసుకుందామా..! ఇంట్లోనే తయారీ : * టోనర్ల తయారీలో ఎక్కువగా వాడే పదార్ధం రోజ్ వాటర్. కాబట్టి దీన్ని అందుబాటులో పెట్టుకుంటే ఇంట్లోనే సులువుగా తయారు చేసుకోవచ్చు. * కప్పు రోజ్ వాటర్ కు రెండు కప్పుల గ్లిజరిన్ కలపండి.దీన్ని ఫ్రిజ్ లో భద్రపరచుకుని, ప్రతిరోజూ కొద్దికొద్దిగా రాసుకోండి. * చిన్న కీరదోస తీసుకుని మెత్తగా గుజ్జులా చెయ్యండి. దీనికి అరకప్పు పెరుగు కలపండి. ఒక స్పూన్ మిశ్రమాన్ని తీసుకుని చర్మానికి రాసుకుని కడిగేయండి. ఆ తర్వాత మాయిశ్చరైజర్ రాసుకోవాలి. * పొడిబారిన చర్మత్వం ఉన్నవారు రెండు కప్పుల పుదీనా ఆకుల్ని నీటిలో వేసి బాగా మరిగించాలి. చిక్కని ఈ నీటిని వడకట్టి సీసాలోకి తీసుకోవాలి .దీనికి కాసిని నీళ్ళు కలిపి, మేకప్ వేసుకునే ముందు చర్మానికి రాసుకోండి. * కోడిగుడ్డు బాగా గిలకొట్టి, ఒక చెంచా తేనె, ఒక చెంచా నిమ్మరసం కలపాలి. ముఖానికి, మెడకు బాగా రాసుకుని, ఆరిన తర్వాత గోరువెచ్చని నీటితో కడిగేయ్యాలి. టోనింగ్ వాడేముందు తీసుకోవాల్సిన జాగ్రత్తలు : * ముందు చర్మాన్ని శుభ్రం చేసుకుని అంటే క్లెన్సింగ్ తర్వాత టోనింగ్ చెయ్యాలి టోనర్ లో దూదిని ముంచి చర్మనికి రాసుకోవాలి. అది చర్మం పై సహజ సిద్దంగా ఆరాక తొలగించాలి. * పొడి చర్మం ఉన్నవారు రోజుకు ఒకసారికి మించి టోనర్ వాడకూడదు. * టోనింగ్ పూర్తయ్యాక వెంటనే మాయిశ్చరైజర్ రాసుకోవడం తప్పనిసరి. లేదంటే చర్మం పొడిబారి గట్టిగా మారుతుంది. * కానీ టోనింగ్ అనేది అందరికి సెట్ అవదు. కాబట్టి ఒకవేళ దానిని రాసుకున్న తర్వాత, చర్మం మంటగా ఉన్నా, దురదగా అనిపించిన, జిడ్డుగా మారిన కూడా వెంటనే మానేయ్యండి.
1. Try before you apply. If you've ever dyed your hair without testing the shade first (and hated the results), then you know how important it is to do a patch test first! To test your self-tanner, apply it to an inconspicuous part of your body (such as your belly) and wait a complete day or two to see how it looks. A single application of self-tanner will last for a few days, applying the wrong shade everywhere could leave you hiding under long sleeves and pants in the summer heat. 2. Plan ahead. Self-tanners work the best on smooth, well-moisturized skin. They often look too dark and artificial on dry skin (especially knees and elbows), so those areas must be softened and smoothed before you start. Prepare your skin to go faux by moisturizing several times a day, especially after bathing or showering. Exfoliate with a gentle scrub all over your body, a few days prior and immediately before applying the self-tanner. Waiting at least 20 minutes after bathing or showing to allow your skin to dry completely. Applying self-tanner on damp or wet skin can result in unevenly-colored areas. 3. Protect your hands. Self-tanners work quickly and if you’re covering your entire body, your palms may get colored in the process. Wear a pair of disposable gloves while applying the self-tanner to your body, applying the tanner to the tops of your hands last. If you don’t have gloves, wash your hands several times and use some soap and a nail brush to scrub away any residue from your nails and cuticles. 4. Apply quickly and evenly. Whether you select a spray, cream or gel self- tanner, you must work quickly and apply the tanner evenly over a complete area. One way to ensure that you don’t miss any spots is to use a brand with a hint of color — that way you will immediately see a bare spot before it’s too late. Use enough tanner to cover a whole area of your body at once (such as your entire arm) using long, smooth, downward strokes for even coverage. Apply self-tanner sparingly on the knees, ankles and elbows, as these areas are typically dry and may turn out splotchy. 5. Wait it out. While you may be tempted to get dressed immediately, wait 30 minutes (or longer) to be on the safe side. Sitting on any light-colored fabrics (including sheets, furniture or towels) during this time can cause color transfer (and stains). Your self-tanner needs time to work its magic, so it has dried, wait at least three hours before bathing, showering or swimming. Afterwards, if you find some areas are darker than you’d like, exfoliate a few times over the next week and the color will fade as your skin cells come off. 6. Make it last. When applied properly, most artificial tans last between three and five days, depending on how fast your skin naturally exfoliates. When you first begin to notice that your color is fading, do another color test and see if you like the shade. If so, go ahead and reapply your self-tanner. Always apply the product in layers, a little at a time, to ensure the most natural looking tone.

Herbal Skin Care Tips Drink at least 8 glasses of water every day. Cut some beet root into small pieces and grind them. Squeeze juice from beet root and massage to your face for 5 minutes. Shower after 10 minutes with mild soap or gram flour. Mix sandalwood powder with rose water and add 4 to 5 drops of milk in it and apply on to your face and body. Shower after 15 minutes with warm water. Mix honey in water and drink daily in the morning to keep your skin shiny and smooth. To prevent wrinkles and soften your skin, you could try pure castor oil; it is known to slow down the aging process of the skin. Another simple and excellent skin conditioner that can be made out of 1 tbsp. honey blended with 2 tbsp. cream (of milk). Leave it on for a few minutes and wash it off. It works like magic. Warm honey and mix with lemon juice and apply on to face. Wash after it dry. Mix Turmeric, sandal powder and olive oil and apply to body. Shower after 10 minutes. Massage your skin with milk. Milk has moisturizer, it will keep your skin smooth. For skin blemishes, you can try rubbing a raw potato on your face.
మొటిమల నివారణ కోసం చిన్న పాత్రలో రెండు టేబుల్ స్పూన్ల ముల్తానా మట్టి తీసుకొని, అంతే మోతాదులో గంధం పొడి, రెండు చుక్కల అల్లం రసం, కోడిగుడ్డులోని తెల్ల సొన, టీ స్పూన్ రోజ్వాటర్ బాగా కలిపి పేస్ట్ చేయాలి. ఈ మిశ్రమాన్ని బ్రష్ సహాయంతో ముఖానికి పట్టించి 20 నిమిషాల తరవాత గోరువెచ్చటి నీటితో కడిగేయాలి. కొన్ని తులసి ఆకులు అంతే పరిమాణంలో పుదీనా ఆకులు తీసుకుని కొన్ని చుక్కల నీటిని జత చేసి పేస్ట్ చేయాలి. ఈ మిశ్రమాన్ని ముఖం మీద అప్లై చేసి 30 నిమిషాల తరవాత గోరువెచ్చటి నీటితో కడిగేయాలి. రెండు టీ స్పూన్ల పసుపులో టీ స్పూన్ రోజ్వాటర్ కలిపి పేస్ట్ చేసి, ముఖంపై అప్లై చేసి ఆరిన తరవాత చల్లటి నీటితో కడిగేయాలి. ఈ ప్యాక్లు వారంలో ఒకసారి క్రమం తప్పకుండా రెండు నెలలపాటు చేస్తే మొటిమలు తగ్గి ముఖం కాంతివంతంగా తయారవుతుంది.

LINE A: First, we will determine the actual line of your eyebrow. This is very important to do before you tweeze your eyebrows. First draw a line following the line of your eyebrow, from beginning to end. Is the line round, like a 1/2 circle, or straight? LINE 1 : To determine where the eyebrow should begin, draw a straight line from the edge of the nose, through the tear duct, straight up. This line shows where your eyebrow should start. If your eyes are close-set, start this line a little further out, to give the illusion of more space between the eyes. LINE 2 : This line starts from the edge of the nose, to the outer edge of the eye, straight up. Your eyebrow should end on that line. An eyebrow that goes beyond this line tends to make you look sleepy, tired, pulling the eye downwards. LINE 3 : Start a straight line at the outside edge of the pupil, straight up through the eye. This is where the highest arch of the eyebrow should be. LINE 4 : Draw this line horizontally through the eyebrow , in a horizontal line, from where the eyebrow starts to where the eyebrow ends along the lower line, meeting where the eyebrow begins and ends. The line should be a straight one. If you find this line slanting at an angle, then you know that either the beginning or the end of the eyebrow is not done correctly.

Beauty tips for glowing skin 1. Hydrate your skin from within by drinking lots of water 2. Before applying all your makeup, make sure your skin is clean and exfoliated. Use a good, gentle exfoliator and rub onto face in slow, circular motions. The circular motions will ensure good blood circulation and the exfoliating will remove dead skin cells, revealing a bright, new complexion. After you’ve exfoliated both face and body, moisturize from head to toe. 3. Moisturizer is the key to soft, supple skin so for results use a Moisturizing Cream that minimizes water loss thus serving the purpose 4. For instant brightening, go for a Vitamin C facial, or else try an instant hydrating mask. 5. Even in the winter season, do not forget to apply sunscreen daily and when exposed to the sun, sunglasses are a must 6. During the festive season, you tend to get puffy eyes. Splashing cold water in the eyes and the use of eye pads with cucumber, potato and green tea bags will help reduce puffiness. 7. For the lips, use a balm that has moisturizing features 8. Skin needs to be conditioned from the inside as well as out. Choose foods and supplements enriched in vitamins which help vitalize your skin 9. Eat foods that are rich in anti-oxidants like fruits, vegetables that help kick-start your immune system 10. Remove makeup to maintain healthy skin. Use a skin cleanser to gently remove dirt, excess oil and makeup 11. Soak a towel in ice cold water and press it to your face; this constricts blood vessels and there’s less fluid accumulation. 12. Catch-up on some shut-eye. Sleep boosts the immune system and is the time your skin gets to regenerate 13. For your hair, make sure to use a mild shampoo and a good conditioner 14. Avoid hot dryers and in case you use hairsprays, glitter and other hair products make sure to wash off all the chemicals from your hair completely 15. For your skin, plan in advance and undergo services like skin polishing or hair reduction

Beauty tips for this diwali You don't want your lovingly hand-painted diyas to outshine you at this year's family Diwali party. You'd rather everyone compliment your rosy glowing complexion than your artfully designed rangoli. That's why you're going to follow our 'Get Glowing Skin this Diwali' plan faithfully, without procrastinating. So here's what to do: Do it at home If you're the domestic goddess or have a pampering mother who will happily whip up some home-made face packs, try these natural skincare treatments for a natural, healthy glow. a) To cleanse your skin daily mix oats and milk or curd (dahi) into a paste. Leave on for 10 minutes. Then wash and pat your skin dry. b) For dry skin mix almond powder with milk/curd, honey and glycerin. Almond and honey are excellent moisturisers. c) Take advantage of seasonal fruits. Mix a segment with mashed a couple of strawberries; oranges are mild bleaching agents and will help with skin pigmentation problems, the strawberries help control oiliness. Naturopath Roopa Shetty, from Nirmal Herbal Spa in Mumbai, says these natural face packs can, and should, be applied everyday. "Leave them on for 10 minutes and then wash. Also, don't miss out on the moisturising benefits of seasonal fruits. So eat your strawberries and drink your awla juice," she says. Quick tip: Most of us want to know how to deal with open pores. The downside is, the problem can't be reversed, but you can shrink them. Apply a mixture of egg white and honey, again for 10 minutes, to tighten pores. This also helps remove fine hair on the face. Get professional pampering Corporate goddesses, with either little time or little inclination for DIY facials, can rescue themselves in the pampering environs of a spa. Most spas are getting into the festive spirit with therapies featuring 24 carat gold dust and natural ingredients like milk, lemon, chocolate or rose. Experts suggest booking a treatment at least 15 days before D-Day so you can benefit from your glow-enhancing facials. Dr Shobha Sehgal, head Beauty Vertical, Indian subcontinent and business head day spa at VLCC, says the glow from treatments such as their brightening/softening milk-based Party Peel last up to 15-20 days. Of course, you have to work to maintain this glow. Dr Sehgal adds, "Home care is necessary after any treatment. Use sunscreen and cleanse and moisturise your skin maintain the effect of the treatment for a longer time." Make-up essentials If you have time for neither, fall back on trusty make-up kit. Since we're talking festive, pick eyeshadows, blush and gloss with golden brown tones, they'll give you a happy glow. For your cheeks: Add a rosy-gold blush with Bourjois Blush Ouvert (N°16 Rose). To highlight your cheekbones, sweep the powder from apples of your cheeks upward. For your eyes: Highlight your eyes with MAC's Making It Easy (Satin red brown/Pearly beige rose/ Satin dark beige) eye shadow, rim the eyes with Yves Saint Laurent chocolate brown pencil liner. For your lips: M.A.C's Disco Blen superglass gloss, with its triple dazzle, helicone pearls will do the trick for instant kissable lips.
Eye Makeup tips for Diwali Tip 1: Go bold, wear gold. Gold is an extremely festive color and goes with this auspicious occasion very well. To sport the perfect gold eyes, apply the Color Tattoo in Bold Gold on your eye lids and finish the eye makeup look with a swipe of the Hypersharp Liner. Tip 2: Another option is to go in for green, peacock eyes with a dash of gold. To don this eye makeup look, first apply the Color Tattoo in Edgy Emerald and then add a bit of Bold Gold to the outer corner of your eyes. When you’re done with the eye shadow, spruce up your lashes by using Volum’ Express The Falsies Mascara on your upper lashes. Tip 3: A light pink hue on your lids is also a good option. You can add this by using the second/third shade from the Diamond Glow Eye Shadow Quad in Wine Pink. If you wish, you can add a bit of the Color Tattoo in Bold Gold to the outer corner of your eyes. Just make sure you blend well. Tip 4: If you’re fond of bright, eye popping colors, line your upper lash line with the HyperGlossy Runway Pop Liquid Liner in Khaki Green or Orange Tangerine. To add, these colors make for the perfect festive colors. Hence, you are sure to look ‘Glam’. Tip 5: Copper brown eye makeup is another option you can try. Apply the Diamond Glow Eye Shadow Quad in Copper Brown on your eye lids. Work outwards from the inner corner of your eyes. To complete the look, apply the Colossal Kajal on your upper and lower lash line.

Skin care tips for this diwali People get so busy with the preparations that they forget to have water. That should not be the case. Drink at least 8 to 10 glasses of water every day. It clears up your skin and gives a healthy glow. Skin gets dry and dull during the festive season. ‘Therefore, don’t forget to moisturise your skin. Eating fried food promotes breakouts and dull skin. So if you can’t resist, limit the intake. Don’t forget the moisturiser At this time of the year skin care is important not just for the festival’s sake but also due to change in weather. People face problems like tight, red or itchy skin. To nourish the skin, experts prescribe oil-based moisturisers and bathing oils. ‘Look for an oil-based moisturiser rather using water-based. Oil protects skin and retains more moisture than a cream. Primrose and avocado oils are great for skin. Also, use exfoliates to get the dead skin off periodically, so that the moisturiser can sink in. A good body scrub and facial exfoliate can help remove dead skin cells. ‘This once a week cleansing routine will make you feel fresh and the skin will be free from dry cells. A few drops of almond and essential bath oils into your everyday bath can help in nourishing your skin.
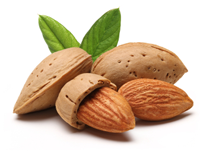
Almonds are packed full of nutrients like vitamin E, magnesium, and healthy monounsaturated fats. These compounds make them nourishing to your body inside and out. Try this recipe to exfoliate and moisturize your skin. 1 cup brown sugar 1/2 cup almond oil 2 tsp honey 1 tsp pure vanilla extract Mix all ingredients together in a shatter-proof bowl. In the shower or tub, massage the scrub into your skin in circular motions (after washing your skin with soap), concentrating on rough or dry areas of the skin. Rinse with warm water, allowing the residual layer of almond oil to remain on the skin. Pat dry.
Honey and oatmeal mask: In order to steal the spotlight with your glowing and healthy skin, you must use this face mask. This mask exfoliates your skin and leaves a healthy glow on it. It is effective on every skin type. ¼ cup fine oatmeal 4-5 tablespoon honey ½ cup water Boil oatmeal with water for sometimes, Let it cool. After 15 minutes add honey. Giving upwards stroke apply this mixture on face and neck. After 20 minutes, wash it off with water. Before applying this mask, clean your face. Lemon and honey tan clear: Prolonged sun exposure may cause sun tanning or sun burn. Cells which cause pigmentation get activated during sun exposure owing to tanning. Lemon contains few acidic ingredients which remove tanning. Mix 2 teaspoon honey and 5 few drops of lemon, apply it on face. Keep it for 10 minutes and wash it off. Apply coconut oil on sunburned areas to get rid of burning sensation and redness.

According to the experts, there are several lifestyle disorders which are the result of stress we come across in our daily routine life. Hair problems are one among them and grey hair is another challenging area for most of the youngsters now. On the other hand several hair colours are also available in our fashion market. However when you are using these colours to your hair, you have to take little extra care. Some of products available in the market are herbal based hair colours, you will still find some chemical component in them. That’s the reason; you have to deal very carefully with your coloured hair. Here goes few tips: • Take some henna leaves and make a paste with them, add 1 table spoon amla powder, 1 table spoon coffee powder and add sour curd to the mixture. Apply this pack to hair, leave for 1 hour and wash your hair with mild shampoo. • Take 5 big sized potatoes and peel them off. Boil the potato skin in 1 glass of water for 15 minutes and let the content settle. Add 5-6 drops of sandal oil to this liquid and store in a container. Apply this liquid after every hair wash and rinse. • Take 1 glass of water and add two table spoons of Tea leaves and boil till the decoction turns in to dark brown colour. Wait till the decoction comes in to room temperature and apply to hair; wait for 45 minutes and rinse your hair with water. Avoid using shampoo. • Take 6-8 table spoons of coconut oil and add 2 spoons of lime juice. Apply this mix to your hair, wait for 1 hour and rinse with water and then wash your hair with mild shampoo. - M.S. Bhavana
Once you are in your late twenties, make cleansing, toning and moisturising a regular habit. Use anti-wrinkle cream before going to bed. 1) Start doing yoga or meditation every day to be stress free. 2) If you are uncomfortable using sun-screen then you can also apply foundation according to your skin tone. 3) Make sure that your skin products do not contain such ingredients which can cause irritation. Do not use products which have menthol, lemongrass, lime or other botanical oils. 4) If you have dry skin then use good moisturiser to hydrate your skin as this type of skin is more prone to ageing. 5) Massage your skin with creams, containing vitamin E. 6) Keep a watch on your weight. Do not lose or gain weight very frequently. 7) Do facial exercises. 8) Apply face mask once in a month and get a thermo spa from good beauty expert at least once in a fortnight. 9) Apply alpha hydroxyl cleanser and lotion on wrinkles. This process lessens the marks. 10) Before going to bed pamper your face with night cream which contains vitamin E or aloevera. 11) Use either face lotion or anti ageing cream. Do not use both of them together.

Here are the top 10 beauty tips in makeup and skin care that best complement a darker skin tone: 1. Moisturise: Those with dark skin, especially with dryness problems, tend to look ashy if skin is not moisturized properly. After your daily shower, make sure you apply a good moisturizer to keep your face and body well-hydrated. This will give you that clear, glowing dusky look. 2. Acne or Pimple Scars: Dark skin is more prone to have acne or pimple scars. Do not pick at your pimples or any other rashes, as they will show up more on your skin than those with lighter skin. 3. The right foundation: While selecting your foundation, the best spot to try it out is not on the back of your hand, but instead, on your forehead and just above your jaw line. Be extremely careful while selecting your shade, as anything that’s lighter than your skin tone may end up making you look greyish. 4. Eye shadows: Dark, metallic colours like green, copper, burgundy, purple and brown will go great with dark skin especially if you’re wearing them at night. 5. Eye makeup: Smoky eyes will look especially good on those with a darker complexion. Make sure you blend it in well, and if you’re looking to create that extra effect, add on a pop of colour around the inner corners of the eye. Also, if you’re mixing two shades, make sure they are of a similar colour family and complement each other well. Use the lighter of the two shades in the middle to inner part of the eyelids and the darker of the two on the outer edge. 6. Lipsticks: Use lip colours like beige, coffee, chocolate, soft pink, plums, berry, burgundy, and gold. Stay away from lipsticks with a frosty finish or ones that are too glossy. 7. Blush: Shades like dark peach, bronze, deep orange, coral, wine, rose and gold and any darker shades of blush will complement your skin best. 8. Powder Foundation: A liquid foundation will work better on your skin than a cream or powder based foundation, as these may end up making your skin look shiny. Dilute your foundation with a bit of water to make it even on the skin. 9. Sun screen: Just because you have a darker complexion doesn’t mean your skin won’t get affected by the harmful UV rays. This is a common mistake that many dark-skinned beauties tend to make. Choose your sunscreen depending on your skin type. 10. Using powder: Darker skin tends to look oily and shiny soon, so it’s advisable to use a face powder that is closest to your skin tone and matches best. Remember, dark is beautiful, and those with dark and dusky skin tones have the best canvas to create various looks in terms of style and makeup. Take pride in your complexion, choose your colours well and use the above tips to create some stunning looks that are sure to bring in those compliments!
Oil therapy: Rub on some olive, almond or coconut oil and massage lightly on to your hands, legs and the rest of your body before heading for a shower. If time permits, heat the oil and then apply. Post shower, use a light moisturiser/sunscreen, because winter sun isn’t any less harsh. Scoop some milk cream: Milk cream makes for a very good moisturiser. Mix a few drops of lime, a tsp. of milk and two tsp. of milk cream and rub onto your hands and legs. Leave it on for a while before you head for a shower. You’ll see the difference immediately. Curd: Curd makes for an excellent skin hydrant, and its antioxidant, anti-inflammatory properties will help soothe your dry, itchy skin. Apply curd just as it is or mix it with some honey and a few drops of lime. Leave it on for at least 10 minutes before you wash it off. It is sure to do wonders for your skin. Honey: Honey helps lock in moisture, has antioxidant and anti-microbial properties, which makes it a sought after ingredient in many over-the-counter skincare products. Why shell out money on those, when you can buy yourself a bottle of honey (which is cheaper) and use it to treat your skin. Lightly heat 2 tsp. of honey any apply it onto your skin (face, hands, legs) while warm. Leave it on for 15 minutes, and then wash it off. There’s nothing better your skin can ask for. Aloe Vera: If you don’t have an aloe plant at home as yet, then make a trip to the nearest nursery and get one, because aloe is super good for your skin! After bath, slice a piece of aloe, squeeze all the gel out and apply onto your face, hands or legs. It will not only moisturise your skin, it will also form a protective layer that will keep impurities from entering your pores. Although aloe is a good skin hydrant, it can leave your skin feeling tight. So you might want to dab on some moisturiser. Milk way: Keep aside a 4 tsp. of raw milk .Add a few drops of rose water/ lime and rub it all over your body and wash with cold water. Do this twice a day. And your skin will feel baby soft.