


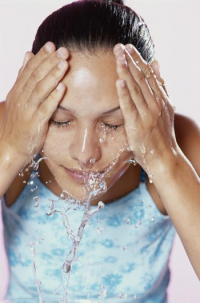
Hot, Cold and Face Hot water may feel like its cleansing your skin more thoroughly, but stick to lukewarm water when washing your face. Water that is too hot can alter the skin's natural oils and leave your complexion overly dry. Lukewarm water is equally effective, much more gentle on the skin. After cleansing, use cool water as a final rinse and pat gently with a clean towel. Follow up with toner, moisturizer or night cream shortly after drying your face to lock in moisture. Always apply a moisturizer and soap, cleansing cream/milk in upward strokes on the skin. Even when patting dry with a towel, pat in upward direction to delay wrinkles, these upward strokes help keep the skin tight.
What's your Tone? Pairing the right color palettes with your skin tone can enhance your features and help you look your absolute best. However, it is a very confusing task when we go to the store to pick suitable eye shadows, lipsticks, foundations, hair highlights or colors and cheek blushes. To make your job easier, Here are the best colors to match with your skin tone: Cool Skin Tone--Red, pink or bluish undertones: Rich colors including black, navy, red, hot pink, emerald green, royal blue or dark purple are the best shades for this skin tone. Warm Skin Tone--Yellow, gold or orange undertones: You will look great in sage green, soft peach, gold, muted browns and bronze. Neutral Skin Tone--Mixture of cool and warm tones: All colors work, so mix and match to find your best look.
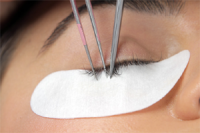
Low on Lashes Some of us have really thick eyelashes, and some have thin lashes and sometimes gaps between the follicles. Eyelash growth has four stages: growing, resting, shedding and regrowing, but the process tends to slow down with age, and some follicles can stop growing altogether. Other than age, here are some major factors that can limit eyelash growth: Rubbing eyelashes too hard or scrubbing hard when removing eye makeup Heredity Medical conditions Some beauty products, medications and treatments Talking to a good dermatologist if you've noticed that your eyelashes are thinning over time so the Doctor can help you find the root of the problem and a remedy to stop the problem. I personally experienced this problem while i was working as a News presenter for a TVChannel where one had to wear heavy eye makeup, i had water running from my eyes after they applied the makeup and also due to the high intensity lighting. My Ophthalmologist suggested i stop wearing even kajal, let alone the Mascara or Eyeliner. She said my eyes didn't allow any foreign particles and hence the reaction. So, sometimes, makeup affects our eyes even if we use it the first time.


Petroleum Jelly Benefits Petroleum Jelly was discovered in 1859 in Titusville, Pennsylvania, United States, on some of the country's first oil rigs. Later Robert Chesebrough, a young chemist took the unrefined black "rod wax", as the drillers called it, back to his laboratory to refine it and explore potential uses. Chesebrough discovered that by distilling the lighter, thinner oil products from the rod wax, he could create a light-colored gel. Chesebrough patented the process of making petroleum jelly by U.S. Patent 127,568 in 1872 and opened his first factory in 1870 in Brooklyn using the name Vaseline. Source- Wikipedia Enough of the trivia… now we all know that the humble jelly is used to heal cracked skin and other winter related dryness, and as the years went by it has been exceptionally used in different DIY beauty formulations . Here are few other ways to benefit from this wondrous jelly: To thicken and lengthen your eyelashes apply jelly at bedtime. Do this for a few days and you will see the lashes grow. The same thing can be done to your eyebrows to. It also comes in handy after you darken your eyebrows; apply a smattering of jelly to seal the look. Jelly also preserves the scent of your perfume. Apply a light coat of Jelly on your neck or pulse points and dab the perfume there .The fragrance will last longer. When you get your hair colored it leaves a dark residue on the hairline- you could apply a coat of jelly on the hairline to prevent the colour from dyeing your skin.
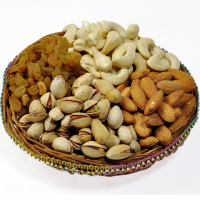
Dry Fruit Facial A new DIY facial that is doing the rounds is the Dry Fruit Facial. Under this therapy, cashew nuts, almonds and other dry fruits are applied to particular skin types. Dry fruits are soaked and ground into pulp and massaged on the face. The same is left on as face mask and washed off. Make sure that you don’t have sensitive or inflamed skin before you try this. 1.Take 1/4th spoon of -Almonds -Cashew -Pistachios -Dry raisin -Soaked dry dates 2. Soak them till soft and combine with Honey and ¼ spoon saffron. 3.Grind this into a semi soft paste leaving it a little grainy for the scrub effect. 4.Massage for 15 minutes in a circular motion and let it dry. 5.You could also take the paste and mix with fullers earth and use it like a mask. 6.After it dries wash off with cool water and dry the face. It not only maintains proper blood circulation but also keeps the face wrinkle-free and glowing for long, without any side effects. So try this at home or ask your beautician to do it for you along with the complete facial routine at the comfort of you salon. And you thought that dry fruits are good only when eaten!
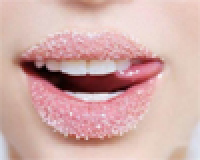
Quick tips for chapped lips Dry lips seems to be a perennial problem and we present 3 do-it-at-home tips to soften and moisturize your lips. 1.Cucumber: The cool cucumber has skin lightening properties and helps remove tan. So it lightens your lips by reducing the dark patches on them and also is a good moisturizer. Take a slice of a cucumber and rub them gently on the lips. Keep for 15 minutes and wash off with plain water. 2. Rose Petals: Rose petals have excellent skin lightening & softening properties and also make your lips hydrated. It helps to keep them pink and smooth, by retaining the natural colour. Soak the rose petals in raw milk for a few hours. Grind them into a smooth paste and apply on the lips. Keep for 15-20 minutes and wash off with rose water for added softness. 3.Lip Scrub: Use granulated sugar for exfoliation once a week or depending on how often your lips become dry. This helps to get rid of dead cells. In 2 teaspoons of granulated sugar, mix a few drops of olive oil. Then add ½ teaspoon of honey and mix well. Leave this mixture for 5 minutes, so that the sugar becomes softer and thus making it easier to apply. Apply all over the lips and scrub gently. Wash off with lukewarm water. This can be done through the year for healthy soft lips!

4 Steps for Thick to Thin Lips Not everyone wants an Angelina Jolie pout and it does get a bit boring to have the same pout every day ! Just like how people with thin lips want fuller lips you can also make your full lips- thin with these simple make up tips. Make up is one the best creations of man for the woman kind and who would disagree... For the thin lip look - you would just have to do the opposite of the techniques used to make them look fuller. So here goes: 1. When you apply the foundation on your face -apply them over your lips completely erasing the natural lip line. 2. Take a lip pencil like dark brown which is a shade darker than your lip line and draw a new lip line below your natural lip line. It is basically reshaping the lips and you could accentuate the cupid bow when you don’t have one. 3. Take a bold lip colour depending on your skin tone and apply it starting from the new lip line and make sure you completely cover it. The dark lip line should be merged with the lip colour completely. 4. Apply an extra coat of lipstick once again and recheck in the mirror to see the new look. Do NOT: 1. Apply lip glosses & glossy finish lipsticks because these create visual fullness. Instead go for matte lipsticksto negate thick lips 2. Highlight the cupid’s bow, as this emphasizes your thick lips 3. Use colours like red, wine & maroon.They will stand out & make your lips more prominent.Go with nude or natural pink shades as this will make your lips look thinner.
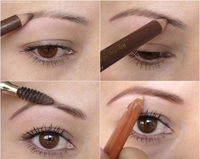
Tips for thick eyebrows There would have been a time when your eyebrows were done badly or due to health issues like thyroid etc. eyebrows tend to thin and there is no way you can make them look thicker other than filling them with the help of an eyebrow pencil . Using an eyebrow pencil, and a bit of petroleum jelly is all that you need to make those thin brows shape up and give some depth . - > Take the eyebrow pencil and using a free and light hand draw strokes in the thin areas. Do not press too hard on the skin. Remember, it's always easier to add color than to remove. - > Stand back at a distance from the mirror to see if the brows are looking balanced. - > Add more strokes if necessary and fine-tune. Add more color if needed. - > Take a bit of petroleum jelly and apply lightly on the brows to seal it and prevent from smudging. Don’t take too much of the jelly or else it would spoil the look. Decide on the color you will need beforehand. If you have dark hair, you should choose a color that is a shade or two lighter than your natural color and vice versa. Don't darken the strokes or else you will have a painted look. Use an old mascara brush to comb the eyebrows after giving the strokes so that they set, this can be done after adding the jelly also.
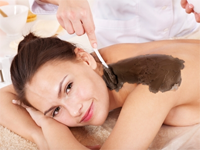
Facials for the Back ! Back acne and rough textured backs are the bane for any lady who wants a smooth back, especially when you are wearing a low cut blouse or evening gown. Just before the event we run to the parlour and get it bleached - but that is not enough for a smooth and even toned skin. Just like the face we also need to give our back the scrubbing and lift it needs- back facial is what we mean! routine with the loofah or scrub, it’s not enough and nothing compares to having a professional treatment in the comforts of your salon.Select a good salon who use branded products or with their own signature facial ingredients.You could try one each time you go for a facial and choose what you like. Ask your beautician to give you the facial routine of a deep cleanse, exfoliation and extractions of any lumpy acne if any, and the finishing touch of a hydrating mask for a smooth and shining back. This can be done after a round of bleach, and all this comes with a wonderful back-lifting massage which is very soothing. This back facial is extremely good especially when you exercise and you are prone to sweaty backs which you face year round. It helps you prepare for the summer season and the impromptu weddings that come and you need to look your best.You will also notice a huge improvement in the the back of your neck and shoulders and feel rehydrated and revitalized !

How to Fake a Beauty spot When we see actresses like Rekha, Jayaprada or Marylyn Monore and Eva Mendes we remember their beautiful natural moles on their faces which give them that diva look. Wish you could have it too? Getting a fake beauty mark is very easy and all you need is an eyeliner pencil and liquid eyeliner, some foundation and translucent powder for finishing to give you the same look temporarily . 1-> Apply foundation as you always do for make up 2-> Choose a spot on your face, whether you want it on the right or left upper lip or below the outside edge of the eye on the cheek, 3->Take the eyeliner pencil and leave a rounder mark. It would be best if you could use brown or mix brown and black colour for the natural effect. 4->After you have fixed the spot take the liquid eyeliner -preferably the water proof and non-smudge one -and mark it. 5->After it dries and you are through with your make up dust the mark with translucent powder for it blend with your make and not make it look like as if you done it up. If you have a wart or mole at the right place you could give it a touch of black or brown and highlight it. Try this for a temporary special diva look!

End split-ends The number-one complaint that most women have nowadays is frizzy split ends in the hair. Young or old women with long or short hair go through this hairy issue. With new trends in hair technology including coloring, perming, straightening, styling using heat rods etc.etc., have also resulted in extensive hair damage where the internal hair structure is exposed causing splits. The only option left is to cut the splits arising out of it. But this can’t be done every time so the other option would be to prevent it from recurring. Conditioning: Something we already know but this time use a wide tooth comb and run it through your hair till it is detangled. A leave-in conditioner will also add extra protection to your hair as you go about your day. When you towel dry your hair do it gently to prevent breakage. Avoid using metal and harsh rubber bands to tie your hair .Also don’t pull it to hard either. Avoid using hot blow driers as they tend to dry your hair and cause split ends. There are also new ones where you can change from hot to cold for drying your hair. Avoid excessive perming and straightening as these treatments use equipment where heat is generated and cause extensive damage to the hair follicle. Gets a good hair spa done using branded products once a month as the leave-on effect of these hair creams help in protecting the hair from split ends. And last but not the least Grandma’s hot oil massage done once a week is the best thing you could do for your hair. Don’t forget the 15 minute relaxing massage! Take folic acid and biotin nutrients which have been proven to improve hair health, length and thickness. A good diet rich in folic acid including green leafy veggies, oranges, soybeans and wheat, and brown rice, lentils, peas, sunflower seeds, walnuts and soybeans rich in biotin are to be incorporated in your diet for a healthy and lustrous hair!

For the perfect cat eye line shape You can get the perfect cat eye shape for your beautiful eyes and enhance the way you look with this simple 5 step procedure .All you need to get is your favourite branded black eye pencil with the thin led or liquid eyeliner. STEP 1: Draw a line starting at the middle of you upper lid, as close to your lashes as possible. This line determines the width of your eye liner, to create a dramatic look make this line thick, or create a thin line for a more subtle look. STEP 2: Creating a straight line requires a bit of practice. You can either draw a single-stroke line or many short strokes. Starting from the inner corner of your eye and moving towards the line you just drew, draw a fine line. STEP 3: To create your eyeliner wing, draw a line starting from the last lash outwards. You can now decide the length & angle to your eye liner. STEP 4: After drawing the wing, draw a line back to your upper lash line. This should create an empty triangle on your upper lid. To make you eyeliner thick, draw a bigger triangle, ending at the middle part of your lash line. STEP 5: Fill the triangle with your pencil you could also try filling it with back grey or mountain blue colored pencil for a different effect. Complete this 1960’s movie star look with 2-3 coats of lengthening, thickening black mascara and highlight the eyebrows in case they are slightly thin.
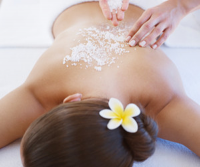
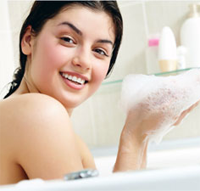
Salt spa scrubs Scrubs are very effective in exfoliating and cleaning the dead skin layers from the body, leaving the body smooth, shiny, glowing and beautiful. Salt scrubs are effective in cleansing the body and can be effective in de-stressing your tired body. You don't need to buy the expensive scrubs from the shops.Salt scrubs can easily be made at home. All you need is rock salt and any oil of your choice- like olive, baby, almond or coconut oil and a few drops of essential oils like rose, lavender, vanilla, musk or jojoba oils. Take glass bowl and take 1 cup of rock salt or sea salt. Slowly pour half a cup of oil to the salt in the bowl and keep stirring gently with a plastic or steel spoon. Then add your 7 to 8 drops of fragrant essential oil of your choice to the mixture. After mixing them together store in a glass jar tightly. Don’t keep this in the bathroom if you want to keep it for a long time to avoid the salt from clumping because of excess moisture. See to that you don’t scrub on injured skin, as it will cause reddening and irritation. Exfoliate twice a week for a glowing skin!
The sleek Low Bun look If you have high cheekbones and rounded jaw line and thinking about what kind a of a hair do to go with your sari or evening gown, you could try the sleek Low Bun look . It is very easy to do and all you need are some bobby pins and an elastic band and some good gel and hair spray. Follow these easy steps for this chic look. 1.First blow dry your hair straight and make a side parting. 2.Pull all your hair back into a low ponytail at the nape of your neck. Tie up the ponytail, and wrap the hair around the band to create the bun. Secure at the base with bobby pins. 3.If there are any strands you left out pull them back into the bun, wrapping them around the base. 4.Secure with a few more bobby pins and mist on some light hairspray. Apply a gel in front to crease out any unevenness for that sleek look.
GIFTS FOR A BEAUTY Let me help you with some suggestions for a gift to a Beauty. Lipstick cases come in leather, who doesn't want to carry one with a mirror inside. For someone who has interest in applying make up, an expensive or good-brand of make-up brushes, a small/ wide set of blush/ eye shadows is a good idea. A nice hair dryer, hair curler/ straightener are specific for someone who uses such products or has interest in using them would be a smart option. For someone who is simple, and doesn't use the above make-up range, a simple Lip gloss set or a wide collection of colorful Bindis, hair bands is appreciated.

Valentine Face Pack Love fruit- Strawberries are not only rich in vitamin C and pottasisim it alo contains salicylic acid which removes the dead cells and clears out the blemishes and when combined with lime juice naturally lightens the skin. Strawberry Mask for skin whitening 1. Mash 3 strawberries and add few drops of lime juice and olive oil to it. Blend this mixture until smooth paste. 2. Cleanse your face with fresh water and a mild cleanser, spread this mask over your facial skin and neck evenly. 3. Gently massage this luscious red paste for few minutes with upward strokes. 4. Dip two cotton pads in rose water and place above your eyes to refresh them. 5. Relax for 20 minutes. 6. After allowing the mask to work on your skin for few minutes, wash off your face with clean and cold water. 7. Pat dry and moisturize. Try this Strawberry face mask, to brighten up your skin for this Valentine’s day .This regime when followed twice a week brightens your complexion and removes spots in few weeks.
Garlic cure to remove warts The tiny little things on your skin which appear on the skin can be quite bothersome as they can make you look awkward especially if they come on the face and the neck. There is no clear reason why they come, it could be because of accumulation of dirt, genetic or any mild infection but the aftermath is quite visible. There are various ways to remove them - by burning them with small needles or through laser treatment or by using special creams. A cheaper and easier alternative is removing it at home with the help of a garlic clove. The acidic nature of this humble garlic will help remove the wart, only that you will have to bear the smell for a couple of days. All you need is a big garlic clove and some tape. 1) Peel the garlic 2) Cut a sliver of garlic the same shape and size of your wart 3) Place the garlic piece on the wart 4) Put a duct tape or masking tape to hold the garlic on the garlic and set it so that it doesn’t fall off 5) Also see to that it doesn’t get wet. 6) Keep the garlic on for 15 minutes a day and you will notice that in a couple of days that the wart will become smaller and then eventually drop off. The wart will disappear between 4-8 days and a small scab like mark on the skin will be left over after the wart disappears. Note: This is not permanent solution and most of these warts might grow back after being removed. You need to check with your dermatologist for a permanent solution.
Baking soda beauty regime We all know that baking soda is used for fluffing up cakes and adding the crisp element to savories or used as an agent for cleaning stains, but not many know that it can be also used as a beauty agent .Its is readily available in the supermarket and inexpensive too. Sitting at home we can use this soft white powder for varied treatments. Body It can be used as a deodorant to eliminate underarm wetness by rubbing your arm pits with a combination of one-eighth of a teaspoon of baking soda and one tablespoon of water. You can also add a cup of baking soda and one- fourth cup baby oil to your bath and relax or add the same to a bucket of luke warm water and have bath for smooth skin. Hair Mix a small palm-full of baking soda to your shampoo to remove buildup from conditioners, mousses and hairsprays. · It also acts like dry shampoo. If you don’t have time for a shampoo use baking soda when your hair is oily. Sprinkle some on your hair, comb through then quickly fluff your hair with a blow dryer. · To repair Chlorine-damaged tresses, mix 1/2 teaspoon of baking soda with 1 pint warm water and wash you hair · You can also clean combs and brushes. Just dip them in warm water mixed with baking soda and liquid soap. Face · Make a face wash by adding it to coconut oil or olive oil and wash your face gently, rinsing with cool water. · For making a facial exfoliator, in the palm of your hand, mix some baking soda with your facial cleanser to make a gentle exfoliator. Use circular motions to apply gently then rinse as usual for very soft skin. · It also treats acne eruptions. Mix it with a little bit of water and apply it to the acne until it dries and wash it with cool water. Mouth · It makes a great tooth polish and whitener. The baking soda works to freshen breathe and whiten and polish teeth. Dip a damp toothbrush in baking soda and brush away. For a double effect you could also dip a toothbrush with toothpaste in baking soda for mouth cleaning. · It is also good for cleaning toothbrushes. Soak your tooth brush in a mixture of water and baking soda and let it soak overnight. Wash the next day. Elbows This also works for the rough skin on elbows. Make a thick paste with baking soda and water (about 3 parts baking soda to one part water) and scrub away. Nails For soft cuticles scrub your nails or toenails with a nailbrush (or old toothbrush) dipped in baking soda will soften and gently exfoliate cuticles. Feet Scrubbing dry, cracked cuticles with a paste made out of equal amount of baking soda and warm water will help to exfoliate dead skin cells and soften your hands.